In my last "
5 Things I'm Diggin'" post, one of my picks was a post-processing technique for simulating an NDG filter. Here's how the technique works. I know it works in Photoshop, Elements, and GIMP and I expect that it can be easily adapted to other image editors as well. My instructions assume you have a handle on the basics of these programs; they're not push-this-button detailed.
First a before/after example so you have an idea of what we're trying to achieve. This isn't a great photo, but it's a decent example of the technique in action.
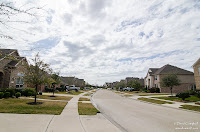 |
| Before |
|
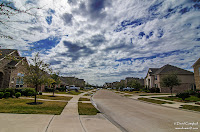 |
| After |
|
- Open your photo. Presumably it's a landscape or cityscape with some amount of sky that you want to enhance.
- First do whatever white balance and exposure adjustments you typically do to optimize the photo. At this point in my workflow, I'm always working with the RAW image, so I try to get it as good as I possibly can here, when I have the most dynamic range to work with. The important thing is to not blow the sky out (i.e. make it so that large portions of the sky are all-out white as indicated by your histogram). If that happens, use the Recovery, Highlights, Whites, or Curves tools (depending on what program you have) to pull back in the extreme highlights so they're not blowing out completely. Otherwise, this technique won't have any detail in the clouds to work with and all it will do is turn your clouds gray!
- Set your foreground color to black.
- Create a new (transparent) layer on top of the original layer.
- Fill the new layer with a foreground-to-transparent linear gradient. You want the gradient to run from the top of the photo to the land, at an angle that is perpendicular to the horizon in the photo. (In Photoshop and Elements, you can combine steps 4 and 5 by creating an adjustment layer of type "Gradient". Using an adjustment layer also has the benefit of allowing you to tweak the gradient settings at any time, versus "painting" in the gradient and having it be a permanent part of the layer.)
- Set the layer blending mode of this new layer to Overlay. You can also try Soft Light and Hard Light to see if you like those better.
- Lowering the opacity of the new gradient layer will reduce the effect if it's too intense. I usually lower it some, but the exact amount depends on the photo. I like pretty deep, rich blues, but it's easy to over-do it. With great power comes great responsibility...
- You can also tweak the rate and location at which the gradient transitions from black to transparent occurs. By default, it transitions smoothly over the entire length of the gradient. But using the various gradient tool controls (they vary depending on the program you're using) you can make it happen more suddenly and over a smaller area, like say, close to the horizon or the top of the photo. If your sky takes up a large portion of the photo, this can be very useful. Remember though, in a real world sky, colors tend to wash out as you get closer to the horizon. The gradient recreates/emphasizes this phenomenon very nicely, so you don't want to go crazy with making the gradient suddenly transition from black to transparent right at the horizon line -- you want it to occur smoothly over some area to make it look natural.


Comments
Post a Comment